

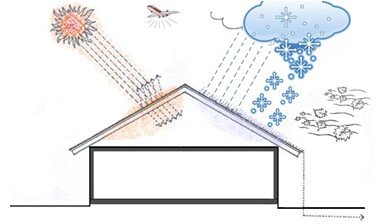
The roof system is a building envelope that limits the building from the top and separates the interior environment from the external atmospheric conditions. The function of the roof is rain, snow, hail, frost, day-night temperature differences, IR and UV radiation, wind, external noises, etc. Under the influence of external atmospheric conditions, thermal, visual, acoustic comfort, security, etc. at the desired level in order for the users to perform their activities in the indoor environment. to meet user needs and protect structure and user health
Roof systems consist of various sub-systems that complement each other in a certain order to fulfill the said function. These are roofing system, construction system, rain water removal system and sound, vapor barrier, heat, water etc. are insulation systems that include insulation materials.
Topics such as roof types, roofing systems, insulations will be discussed together with the subject of “Tiles and application techniques”.
Tile in the Roof System and Its Application Techniques
TILE as a
clay-based roofing material. The clay-based roofing material, which is widely used in our country, started to be used in Ankara houses in the late 17th century during the Ottoman period. It has a very common usage area because its main ingredient is clay and it is easy to find. The adventure of baked clay, which started with Turkish tile in our country, has been widely used on our roofs with different names and types such as Marseille, Valencia, Mediterranean, Turin, Venice, Alaturka, Granada.

Tile according to TS 3457:
| Appearance | : | It should have a smooth surface, there should be no cracks, cracks in the corners and edges, pieces of lime and bursts. There should be no obvious color differences. |
| Format | : | There should be no skewness and deformities, direct deviation values to be detected in the chin, palate and nails, and chin and palate sockets should not be more than 3%, and deviation values from the plane should not be more than 2%. |
| Sonority | : | The tiles should give a recognizable sound when inspected. |
| Water absorption rate | : | The mass water absorption rate of the tiles should not be more than 13%. |
| Flexural Strength | : | The breaking loads of the tiles should not be less than 1200 N. |
| frost resistance | : | After the test, cracks, ruptures, flaking, scattering and similar damages should not be observed on the tiles. |
| Harmful magnesia-Lime | : | Although color changes and blooming can be seen on the tiles, no damage such as cracks, flaking or rupture should be observed. |
| Dimensions | : | Length should be 420 +/- 10 mm, Width 210 +/- 5 mm For Type I tile. |
In brief, tile is a material obtained by blending clay, clayey soil and mud, mixing water, sand, ground brick dust, ash and the like, shaping it with machines, and firing it in kilns after drying, and used to protect the roofs of buildings from precipitation. Roof tiles, which are widely used in the construction industry, are produced with their accessories in accordance with TS 3457 of the manufacturers. Ridge, ridge termination, three-way ridge and side cover tile, ventilation tile, ventilated ridge, air permeable tapes, etc., as tile accessories. elements are produced.
Roof Types:
Roof types can be classified in various ways depending on the structure of the roof, its usage, construction, coating and insulation.
According to usage: Roofs that can be walked over, Roofs that cannot be walked over,
According to the flow and form of precipitation water: Flat roofs, Roofs with low slopes, Roofs with high slopes, Roofs with variable slope.
According to the coating material: Bitumen-based coated roofs, Cement-based coated roofs, Clay-based roofed roofs, Metal-based coated roofs, Plastic-based coated roofs, Other (Glass, Stone, Wood) coated roofs.
Depending on the insulation type of the roof: Cold roofs, Warm roofs
According to the construction: Fitted, Suspended, Mixed
Roofs can be divided into types and classes.
Cold and Warm Roof Systems
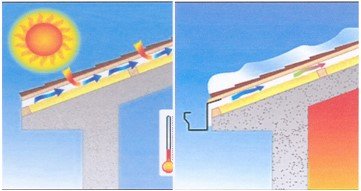
In order to reduce the fuel consumption and energy costs caused by heating and cooling by preventing heat losses in winter months and heat gains in summer months on pitched roofs, to prevent damages such as perspiration and mold and to provide indoor thermal comfort conditions, heat insulation material is used.
The roof system in pitched roofs is classified in two ways as cold and warm roofs, depending on where the thermal insulation material is used in the roof. In cold roofs, the thermal insulation is located on the ceiling-flooring, Figure 1. In this type of roofs, attic space is not used. In warm roofs, the thermal insulation material is located at the level of the roof construction component that creates the slope; For example, in wooden construction roofs, the thermal insulation material is placed above, between or below the rafters. In this type of roof, the attic is used as a living space, Figure 2.

Ventilation on Roofs:
A continuous and effective ventilation should be provided between the roofing material and the waterproofing layer in order to remove the water vapor reaching between the roof layers from the roof and to ensure the efficient operation of the thermal insulation layers. With the air circulation created in this way, the heated stagnant air mass formed under the tile in summer is thrown out, creating a cool area under the roof.
Waterproofing on Roofs:
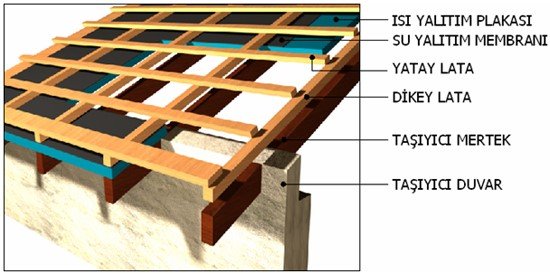
A waterproofing layer is needed to remove the water, which can enter under the roofing material in various ways, from the roof before it reaches the lower layers. This layer was made with bitumen impregnated cardboard covers called ruberoid in the recent past. Today, bitumen-based or bitumen-free waterproofing membranes or corrugated waterproofing sheets are used. Application of waterproofing membranes on roof concrete, cladding board or heat insulation layers with a double lath (vertical and horizontal) system is the most correct application.
Thermal Insulation on Roofs:
Thermal insulation has become inevitable in terms of energy and fuel economy, healthy environment and living comfort. Roofs must be insulated. In terms of minimizing the expansion of the building elements and preserving the heat of the mass of the heated building for a long time; It is more beneficial to insulate from the outside. The same system applies to buildings that are cooled in the summer.
The most basic feature of thermal insulation materials is the heat transmission coefficient (?, W/mK). Other materials are considered building materials.
Heat insulation materials:
- Mineral fiber thermal insulation materials (Glass wool, Rock wool)
- Mineral Thermal insulation materials (Expanded perlite)
- Rigid Plastic foam thermal insulation materials ( Granular polystyrene – EPS, Extruded polystyrene – XPS, Polyurethane etc.)
It is divided into three groups.
Depending on the type of thermal insulation products, they should be covered with waterproofing materials and the penetration of water into the body of the thermal insulation products should be prevented. This rule may not be applied for thermal insulation materials that do not absorb water and the waterproofing layer may be placed under the thermal insulation layer. During insulation, necessary ventilation measures should be taken to evacuate moisture and steam. Thermal insulation materials that will carry loads must be resistant to mechanical loads and impacts.
Under Tile Lath Applications:
The laths to be applied under the tile ensure that the tiles are placed properly and maintain the same line. It prevents the tiles from breaking and leaking water. Imbalances and elevation differences that may occur on the roof surface are prevented. It ensures a solid and smooth application of tiles, prevents slipping, allows tiles to be fixed with wire, hooks and nails. It ensures safety by preventing harm to people and the environment in winds and storms. Allows ventilation under the tile. Laths can be applied transversely and longitudinally on the roof. In the Single Lane-Double Latched system application, mostly vertical rafter spacings are left between 50-60 cm. In this case, 2,5×3.5 cm lath should be used. In practice, 3.5 m per square meter. lath is used. Horizontal lath intervals are applied in the dimensions of the lower palate and between the nails of the tile. Depending on the type of tile, this range is approximately between 31.5 cm and 34 cm. While lath application is made on reinforced concrete pitched roofs, the defects on the surface are made by feeding under the laths by means of wooden correction wedges. Laths are applied parallel to the eaves on the reinforced concrete surface, and the laths are applied staggered at 1.5-2 meters with a gap of 3 cm between them. The first lath at the eaves end is selected 2 cm higher than the other laths, so that the slope of the first row of tiles is the same as the other tiles.
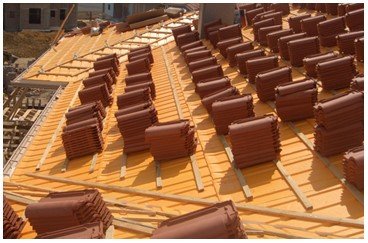
Laying and Fixing the Tiles:
After the appropriate wooden lath infrastructure and thermal insulation are made according to the condition of the roof, the tiles are mounted to form the first row from right to left by pulling a rope to hang 4-6 cm into the stream parallel to the eaves.
Tiles such as Marseille, Valencia, Venice are calculated as an average of 15 pieces / m2 per square meter . Corrugated Turkish style tiles are 28-34 pieces / m 2 according to their size and size. is calculated. While the tiles are laid on the bitumen-based under-tile plate, the plate is connected over the gutter with the tile fastening channels and with galvanized nails with washers. The entire skirt row is tied, the above rows are crossed and two skipped and tied once. Corrugated tiles are mounted on a special plate with eaves hooks and intermediate hooks. Except for Marseille and Mediterranean type tiles, tiles cannot be stacked in a staggered manner, as their profiles are not suitable for staggered alignment. Tiles should never be blocked with mortar. Tiles are not only fixed with hooks. The fastening holes in the tile structure can be opened with a drill or a suitable nail and fixed by nailing copper wire, galvanized wire and pole. All fastening work should be done on battens. It is applied by cutting the upper and side parts by preserving the level of the subfloor on the roof details (chimneys, birdhouses, stairs and skylights, etc.) that prevent the uninterrupted laying of the tiles. The cut parts should not be released, additional laths should be placed and fixed on the lath with nails. The fixation of the cut pieces can also be done with the tile fastening hook and fastener.
Eaves Application and Elements:
The laying of tiles starts from the eaves. The eaves line is the first row of tiles to be laid. Eaves lath is 2 cm compared to other laths. is chosen higher, so that the first row of tiles has a smooth slope and the same direction as the other tiles.
The distance between the eaves lath and the second lath determines the overflow distance of the tiles from the roof eaves. This distance allows the water on the tile to descend into the stream without exceeding the outer cheek of the stream.
Stream hanger clamps are mounted from below or above the eaves lath, depending on the situation. Snow load should be taken into consideration while choosing the stream and the length of the creek section hanger clamp and the hanging of the tile from the eaves should be calculated accordingly. Overflow distance 4-6 cm according to the roof slope. should be. In lower overflows, there is a risk of water entering under the tile. In some cases, we can reduce the overflow distance of the eaves tiles into the stream system to zero by using the front eaves closing element.
PVC eaves ventilation elements, which are called combs in the market, have also started to be used frequently on roofs. Due to its structure, the eaves ventilation element provides solutions to three problems. It allows the eaves tiles to be raised and have the same plane as the other tiles. It prevents the entry of leaves, birds and similar substances under the tile. It provides ventilation under the tile. Again, PVC-based eaves barrier elements can also be used on eaves. This product does not provide ventilation and is used as an obstacle on the eaves.
Mahya Application and Auxiliary Elements:
Since fixing the ridge tiles with mortar affects both appearance and ventilation negatively, this type of application was abandoned and the application we call the Dry Ridge (Ventilated Ridge) system came to the fore. The materials used for this application are: 5×5 cm wood to form the ridge purlin, Metal purlin support element, Rid ventilation band and ridge holder clips.
We can examine the ridge line in two parts as ridge and inclined ridge (mail ridge). Inclined ridge line purlin profiles or wedges can be placed every 60 cm. The height of the purlin board is determined by the type of tile. This determination will ensure that there is a 0.5 cm distance between the ridge and the top of the tile, and that the ridge will press on the tiles evenly when the ventilation band is placed.
Purlin profiles or wedges are placed in the ridge every 100 cm. The height of the purlin lath is determined on the spot. Namely; Three or five of the ridge line tiles are arranged and then the ridge is placed on it. It is checked that the ridge fits on the tiles evenly. The height of the ridge lover is determined by adding 0.5 cm to the measurement between the highest point of the roof and the lowest part of the ridge. The purlin board is fixed to the purlin bearing profile or wedges. The ridge ventilation band is nailed or stapled on the purlin board. The lower edges of the ventilation tape are adhered to the tiles by means of its adhesive surface. Ridge tiles are fixed to the purlin board with a ridge tile fixing element (clip) to prevent them from flying and sliding. The ends of the ridges used at the end of the ridge line must be closed. We call these ridge terminations.
Mortared ridge system, when this system is desired to be applied despite various negativities, it is recommended to grout only the inside so that the ridge tiles are not visible from the outside. In such a system , it is necessary to use ventilation tiles, one for 12 – 18 m2 .
Ridge line is named as ventilation tape-airband and it is adhesive on the edges, expandable UV resistant, polypropylene based, metal reinforced according to the color of the tile, provides a good protection against snow, water and dust as it adheres perfectly on the tile, makes the roof breathe. 5-10 cm. long and 28-32 cm. produced in width. It is an aesthetic product.
In single pitched roofs, the ridge line is solved in two ways. With a dry ridge system, it is with two sets of tiles. Set tile is a special tile. Thanks to its rear extension profile, it not only provides ventilation, but also performs the function of a dripper and ensures the removal of water from the facade. It is essential to fix the lath at the bottom. Covering tiles should be used on the right and left sides and they should be fixed with nails to the side eave board through the nail holes.
Side Eaves Coverings and Closure Elements:
Clay-based side eaves covering elements produced to cover the eaves side edges can be produced in tile type, as well as those that adapt to every tile. These hang from the top of the tile to the edge of the eaves, providing both aesthetics and excellent resistance to strong winds.
Side eaves elements are produced as right-left as well as as a single type. Side eaves elements must be fixed, after the vertical support lath is placed, they must be fixed to the side edges through the nail hole or with special fasteners.
Side eaves coverings can be made of tile material, copper, UV-resistant rigid PVC and polyester material.
Mail Stream, Chimney and Wall Bottom Details:
Mail creek, also known as tilted creek, is the creation of a rainwater flow channel, also called valley stream, which is formed according to the mobility of the roof. In the past, the streams on the roofs were provided with zinc, copper and similar plates. Today, alternative products to these materials are offered to the market. These are membranes with aluminum foil, membranes with mineral stones suitable for the color of the roof, PVC and polyester-based mail stream elements, etc. is Whatever material is preferred, the important thing is to prepare the infrastructure.
20-25 cm upwards from the eaves on both sides of the Mail creek bed axis. at a distance of 2.5 x 3.5 cm. size of lath should be applied, and the stream material should be applied in such a way that it covers the laths by covering the inside of the stream. In times of heavy rainfall, it is necessary to prevent the rain waters descending from the tile into the stream from penetrating under the tile.
Chimney bottoms are one of the critical places on the roof that must be done with care. Since the chimney dimensions are not standard, the materials are cut according to the measurements taken on site. The edges of the chimneys are the places where the water accumulated by the snow easily reaches. According to the slope of the roof, care should be taken by taking into account the flow direction, snow melt, and adverse rains. Chimney bottoms can be made with zinc, copper, foiled and mineral stone membranes, self-adhesive foiled tapes produced for these areas, or PVC and polyester based materials. The insulation material should be applied under the tile behind the chimney, under the tile on the sides, and on top of the tile in the front, if necessary, a channel should be created around the chimney with the help of laths and laths. Theoretically, the insulation material around the chimney is prepared as follows.
| MOST | SIZE | |
| 1. Front piece | : 30 cm. | A+2×15 cm. |
| 2. Edges | : 30 cm. | B+2×15 cm. |
| 3. Back piece | : 30 cm. | A+2×15 cm. |
| 4th Generation | : 15 cm. | 2A+2Bx10 cm. |
Pressure strip should be applied around the chimney parallel to the slope of the roof.
If there are side parapet walls on the roof, either a stream should be created from the top to the eaves gutter or waterproofing should be done on the tile from the side parapet wall. These operations should be done by applying pressure strips to the side parapet wall with zinc, copper, membrane and insulation tapes or by entering under the parapet wall top coating.
The bottom of the shield wall should be insulated like the side parapet wall. Here, the insulation material is placed on the tile 15-20 cm. should be extended.


